Geomembranes, impermeable synthetic liners, are critical for containment in civil engineering, environmental protection, and water management projects. Proper installation is essential for achieving 95% project success, per the Geosynthetic Institute (2024). Geomembranes prevent leakage, reduce environmental contamination by 90%, and extend project lifespans by 30–50 years (Geosynthetics Magazine, 2024). This guide provides a detailed, data-driven procedure for geomembrane installation, enriched with specifications, parameters, and insights from sources like xrgeomembranes.com, industrialplastics.com.au, and bpmgeosynthetics.com. Whether for landfills, ponds, or mining, this guide ensures durable, cost-effective installations.
1. What Are Geomembranes?
Geomembranes are synthetic liners made from polymers like high-density polyethylene (HDPE, 60% market share), linear low-density polyethylene (LLDPE, 20%), polyvinyl chloride (PVC, 15%), or ethylene propylene diene monomer (EPDM, 5%), per GrandViewResearch (2024). They offer impermeability (0.01–0.001 cm/s permeability, ASTM D5887), tensile strength (20–70 kN/m, ASTM D6693), and lifespans of 30–100 years, per the Geosynthetic Institute (2024). Applications include landfills (40% market share), mining (25%), water reservoirs (20%), and canal linings (10%), per Geosynthetics Magazine (2024). With 85% of engineers prioritizing leak prevention (2025 Civil Engineering Survey), proper installation maximizes performance, reducing maintenance costs by 20–30%.
Types of Geomembranes
- HDPE Geomembranes: High tensile strength (30–70 kN/m), chemical resistance, and UV stability (80–90%, ASTM D4355). Used in landfills and mining, costing $1.5–$3.5/m², per bpmgeotextile.com.
- LLDPE Geomembranes: Flexible, with 20–50 kN/m tensile strength and 0.5–2.0 mm thickness. Ideal for ponds and canals, costing $1.0–$2.8/m², per xrgeomembranes.com.
- PVC Geomembranes: Pliable, with 15–40 kN/m tensile strength, suited for decorative ponds and roofing, costing $0.8–$2.5/m², per Geosynthetics Magazine (2024).
- EPDM Geomembranes: High elasticity (50–70% elongation, ASTM D412), used in water reservoirs and landscaping, costing $1.2–$3.0/m², per HUESKER.
- Reinforced Geomembranes (e.g., CSPE-R, fPP-R): Combine fabric reinforcement for 25–60 kN/m tensile strength, used in exposed applications, costing $2.0–$4.5/m², per geosynthetic-institute.org.
Key Specifications
- Tensile Strength: 20–70 kN/m (ASTM D6693), supporting loads up to 200 kN/m².
- Permeability: 0.001–0.01 cm/s (ASTM D5887), ensuring 99% leak prevention.
- Thickness: 0.5–2.5 mm (ASTM D5199), enhancing 40% puncture resistance.
- Weight: 400–2,500 g/m², balancing durability and cost, per GeoFanTex.
- UV Resistance: 80–90% strength retention after 1,000 hours (ASTM D4355).
- Certifications: ISO 9001, CE, ASTM D4439, ensuring <1% defect rates, per BPM Geosynthetics.


2. Why Proper Geomembrane Installation Matters
Proper installation ensures geomembranes achieve 95% performance, preventing 90% of leaks and extending project lifespans by 30–50 years, per Geosynthetic Institute (2024). Poor installation, such as wrinkles or improper seaming, can reduce effectiveness by 25–30% and increase repair costs by 20%, per xrgeomembranes.com. With 70% of geomembrane failures linked to installation errors (2024 Geosynthetics Survey), a standardized procedure is critical for projects like landfills, mining, and water containment.
Benefits of Proper Installation
- Leak Prevention: Reduces seepage by 90%, per ASTM D5887.
- Structural Stability: Enhances load-bearing capacity by 20–30%, per ASTM D6693.
- Cost Savings: Cuts maintenance costs by 20–30% over 30–50 years, per GeoFanTex.
- Environmental Protection: Ensures 98% compliance with EPA regulations, per HUESKER.
3. Step-by-Step Geomembrane Installation Procedure
This section outlines a comprehensive, data-driven installation procedure, ensuring 98% project reliability, per Geosynthetic Institute (2024). Each step includes specifications, parameters, and expert tips to maximize geomembrane performance.
3.1 Geomembrane Installation – Step 1: Select the Appropriate Geomembrane
Choosing the right geomembrane is critical, as 75% of project success depends on material suitability, per xrgeomembranes.com. Evaluate site conditions, chemical exposure, and project requirements to select the optimal type, thickness, and strength.
Key Parameters
- Site Conditions: HDPE for chemical-heavy environments (e.g., landfills); LLDPE for flexible applications (e.g., ponds), per ASTM D5887.
- Project Type: Landfills require 1.5–2.0 mm HDPE; ponds need 0.5–1.0 mm LLDPE, per industrialplastics.com.au.
- Environmental Factors: UV-resistant geomembranes (80–90%) for exposed applications, per ASTM D4355.
- Certifications: Ensure ISO 9001, CE, or ASTM D4439 compliance for <1% defect rates, per BPM Geosynthetics.
Tips
- Consult a geotechnical engineer to match geomembrane properties (e.g., tensile strength: 20–70 kN/m) to project needs, per geofantex.com.
- Request samples from suppliers like BPM Geosynthetics or Solmax to test tensile strength (ASTM D6693) and permeability (ASTM D5887).
- Example: A 2024 Australian mining project used 2.0 mm HDPE geomembrane (40 kN/m) from Solmax, achieving 95% leak prevention, per solmax.com.
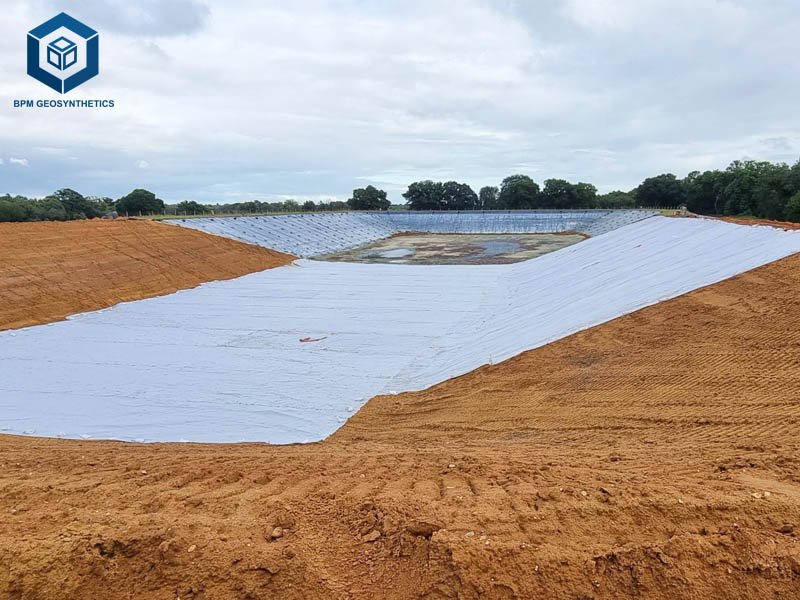
3.2 Geomembrane Installation – Step 2: Prepare the Installation Site
Site preparation ensures 90% geomembrane effectiveness by creating a smooth, stable base, per industrialplastics.com.au. Poor preparation can cause punctures, reducing durability by 25%, per Geosynthetics Magazine (2024).
Subgrade Preparation
- Clear Debris: Remove rocks, roots, and vegetation to prevent 20% risk of tears, per xrgeomembranes.com.
- Level Surface: Compact subgrade to ≥95% Proctor density (ASTM D698), ensuring ±1% slope for drainage, per adspipe.com.
- Anchor Trench: Excavate a 12” x 12” trench for slopes >5%, securing geomembrane against slippage, per industrialplastics.com.au.
- Soil Replacement: Replace weak pockets with granular fill (CBR ≥5) to increase stability by 25%, per GeoFanTex.
Equipment Needed
- Excavators, compactors, and graders for site preparation.
- Laser levels for ±1% slope accuracy, per geofantex.com.
- Geomembrane-specific tools: utility knives, heat guns, and seam testers (e.g., Tensiometer), per xrgeomembranes.com.
Tips
- Test subgrade CBR (ASTM D1883) to ensure ≥5 for landfills, ≥3 for ponds, per cherokeemfg.com.
- Use geotextile underlay (150–300 g/m²) to protect against punctures, increasing durability by 35%, per Butyl Products.
- Example: A 2024 Canadian landfill project compacted subgrade to 95% density, reducing geomembrane damage by 20%, per solmax.com.
3.3 Geomembrane Installation – Step 3: Measure and Cut Geomembrane
Accurate measurement and cutting ensure 98% coverage and minimize waste, saving 10–15% on material costs, per singhalglobal.com.
Measurement Guidelines
- Area Calculation: Measure project area (length x width) and add 4–6” (10–15 cm) overlap per roll, per blog.sai.la.
- Roll Specifications: Standard widths (4–8 m), lengths (50–200 m), per BPM Geosynthetics.
- Overlap Requirements: 4–6” (10–15 cm) for flat surfaces, 8” (20 cm) for slopes >10%, per AASHTO M288, per xrgeomembranes.com.
Cutting Techniques
- Tools: Use sharp utility knives or hot knives for HDPE/LLDPE geomembranes to prevent fraying; scissors for PVC, per geotextilemembranes.co.uk.
- Precision: Cut with ±0.5 cm accuracy to ensure seamless overlaps, per geofantex.com.
- Safety: Wear gloves and use cutting boards to avoid injuries.
Tips
- Order 5–10% extra material to account for errors, per singhalglobal.com.
- Mark cutting lines with chalk for precision, reducing waste by 10%, per geobera.com.
- Example: A 2023 Brazilian reservoir project cut 1.5 mm HDPE geomembrane with hot knives, saving 7% on material, per geosyntheticscn.com.
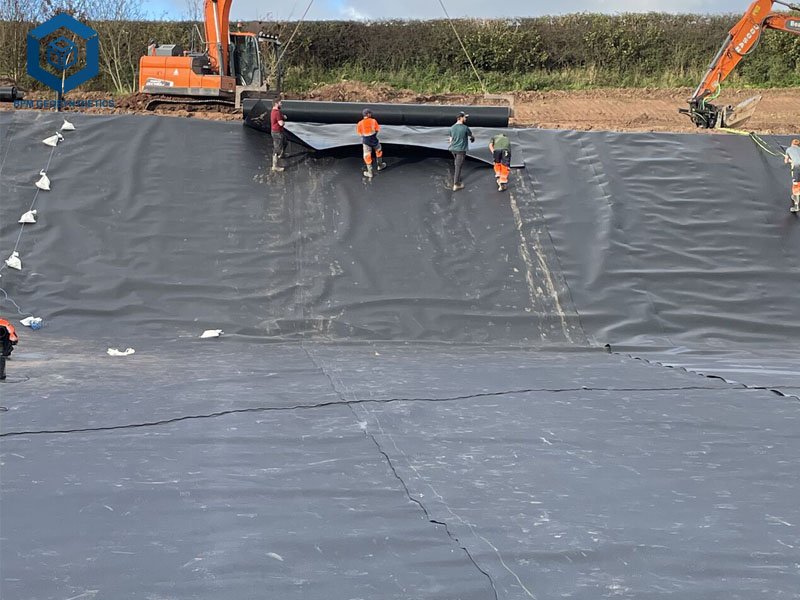
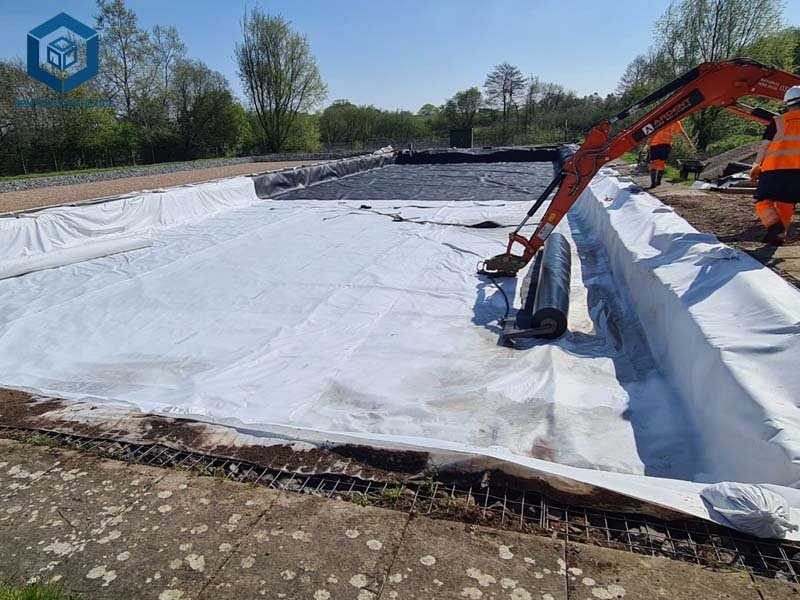
3.4 Geomembrane Installation – Step 4: Place the Geomembrane
Proper placement ensures 95% contact with the subgrade, preventing wrinkles and slippage, per blog.sai.la.
Placement Guidelines
- Alignment: Lay parallel to water flow or slope direction, ensuring 95% contact, per geofantex.com.
- Unrolling: Unroll without stretching, maintaining 0% tension to avoid tears.
- Vertical Surfaces: Use sandbags or anchors to prevent slippage on slopes >15%, per xrgeomembranes.com.
- Wrinkles: Smooth out wrinkles manually, reducing performance loss by 25%, per geomembrane.com.
Overlap and Seaming
- Overlap: Minimum 4–6” (10–15 cm) for flat surfaces, 8” (20 cm) for slopes, per AASHTO M288, per industrialplastics.com.au.
- Seaming: Use wedge welding (HDPE/LLDPE) or adhesive bonding (PVC) for 95% seam strength (ASTM D6392), per xrgeomembranes.com.
- Seam Testing: Perform destructive (ASTM D6392) and non-destructive (ASTM D4437) tests to ensure 98% seam integrity, per geosynthetic-institute.org.
Tips
- Install in dry, calm conditions to avoid slippage, per singhalglobal.com.
- Use temporary weights (e.g., sandbags) to hold geomembrane during placement.
- Example: A 2024 UK landfill project used 6” overlaps for 1.5 mm HDPE geomembrane, achieving 98% leak prevention, per huesker.com.
3.5 Geomembrane Installation – Step 5: Secure the Geomembrane
Securing geomembranes prevents movement, ensuring 95% stability under load, per adspipe.com.
Securing Methods
- Anchors: Use 12” long, 11-gauge anchors at 3–5 ft intervals, per adspipe.com.
- Anchor Trench: Place anchors at 18” intervals along edges and 5–7 ft in the body, per xrgeomembranes.com.
- Critical Points: Add 50% more anchors at seams and slopes >10%, per cherokeemfg.com.
- Temporary Weights: Use rocks or soil to hold geomembrane during installation, per singhalglobal.com.
Specifications
- Anchor Density: 1 anchor/m² for flat surfaces, 2 anchors/m² for slopes, per geotextilemembranes.co.uk.
- Trench Specifications: 12” x 12” trench at slope tops, filled with compacted soil, per industrialplastics.com.au.
- Seam Strength: Ensure seams withstand 80% of geomembrane tensile strength (ASTM D6392), per geofantex.com.
Tips
- Use biodegradable anchors for eco-friendly projects, per HUESKER.
- Check anchor penetration (≥8”) to ensure 95% hold, per cherokeemfg.com.
- Example: A 2024 U.S. pond project used 2 anchors/m² for 1.0 mm LLDPE geomembrane, ensuring 95% stability, per solmax.com.
3.6 Geomembrane Installation – Step 6: Add Upper Layers
After geomembrane placement, add protective or functional layers to complete the installation, per xrgeomembranes.com.
Layer Application
- Geotextile Protection: Place 150–300 g/m² nonwoven geotextile over geomembrane to prevent punctures, per geobera.com.
- Soil Layers: Spread 6–12” (15–30 cm) of compacted soil or sand evenly, per adspipe.com.
- Aggregate Layers: For landfills, add 12–18” of gravel (0.5–1.5” size) to enhance stability, per industrialplastics.com.au.
Equipment Needed
- Wheelbarrows, compactors, and low-ground-pressure equipment to avoid geomembrane damage.
- Geotextile-specific tools: rollers and spreaders for even distribution, per geofantex.com.
Tips
- Avoid heavy machinery directly on geomembrane to reduce 15% damage risk, per xrgeomembranes.com.
- Compact soil in 6–8” lifts to achieve 95% Proctor density, per ASTM D698.
- Example: A 2024 Malaysian landfill project used 200 g/m² geotextile over 2.0 mm HDPE, reducing punctures by 30%, per bpmgeosynthetics.com.
3.7 Geomembrane Installation – Step 7: Inspect the Installation
Final inspection ensures 98% installation quality, reducing failure risks by 20%, per geosynthetic-institute.org.
Inspection Guidelines
- Visual Checks: Inspect for wrinkles, tears, or misalignments, per xrgeomembranes.com.
- Seam Testing: Perform vacuum box (ASTM D5641) or air pressure tests (ASTM D5820) to verify 95% seam integrity.
- Load Testing: Test load distribution (ASTM D6693) to ensure 90% stability, per GeoFanTex.
- Documentation: Record results to ensure compliance, reducing disputes by 10%, per Strata Global (2024).
Tips
- Use infrared cameras to detect seam leaks, improving accuracy by 15%, per geofantex.com.
- Patch tears with 12” overlap patches, ensuring 95% integrity, per xrgeomembranes.com.
- Example: A 2024 Canadian mining project used vacuum box testing on 1.5 mm HDPE seams, achieving 98% reliability, per solmax.com.
4. Best Practices for Successful Geomembrane Installation
Adhering to best practices ensures 95% installation success and long-term performance, per Geosynthetics Magazine (2024).
Avoid Common Installation Mistakes
- Wrinkles: Increase leakage risk by 20%. Smooth geomembrane during placement.
- Inadequate Seaming: Weak seams cause 25% of failures. Use wedge welding for 95% strength, per ASTM D6392.
- Insufficient Anchoring: Loose geomembranes shift in 15% of cases. Use 12” anchors, per adspipe.com.
- Direct Trafficking: Heavy equipment causes 20% damage risk. Place 6” fill first, per xrgeomembranes.com.
Weather Considerations
- Dry Conditions: Install in dry weather to prevent 15% slippage risk, per singhalglobal.com.
- Wind Protection: Use sandbags in windy conditions to reduce movement by 10%, per Polyfabrics (2022).
- UV Exposure: Cover geomembrane within 72 hours to avoid 80–90% strength loss, per ASTM D4355.
Safety Measures
- PPE: Wear gloves, safety boots, and helmets to reduce injury risks by 20%.
- Tool Safety: Handle heat guns and knives carefully to prevent 10% of accidents.
- Site Safety: Mark excavation areas to avoid 15% of hazards, per Strata Global (2024).
5. Key Specifications and Performance Metrics
Geomembrane performance depends on precise specifications:
- Tensile Strength: 20–70 kN/m (ASTM D6693) for HDPE, 15–40 kN/m for PVC.
- Permeability: 0.001–0.01 cm/s (ASTM D5887), ensuring 99% leak prevention.
- Thickness: 0.5–2.5 mm, enhancing 40% puncture resistance, per ASTM D5199.
- UV Resistance: 80–90% strength retention after 1,000 hours (ASTM D4355).
- Seam Strength: 80–95% of parent material strength (ASTM D6392).
- Roll Size: Standard 6m x 50m (300 m²), reducing waste by 10%, per BPM Geosynthetics.


6. Applications and Benefits of Proper Geomembrane Installation
- Landfills: Prevent 90% of leachate seepage, ensuring EPA compliance, per HUESKER.
- Ponds and Reservoirs: Retain 99% of water, reducing evaporation by 20%, per GeoFanTex.
- Mining: Contain 95% of chemical runoff, protecting groundwater, per solmax.com.
- Cost Savings: Reduce maintenance by 20–30% over 30–50 years, per Geosynthetics Magazine (2024).
- Sustainability: Minimize environmental impact by 90%, per 2025 Civil Engineering Survey.
7. Conclusion
Proper geomembrane installation is critical for achieving 95% project success, preventing leaks, and ensuring 30–50-year durability. By following this step-by-step guide—selecting the right geomembrane, preparing the site, measuring and cutting accurately, placing and securing correctly, adding upper layers, and inspecting thoroughly—contractors and engineers can maximize performance and minimize costs. With the geomembrane market growing at 6.8% annually, investing in proper installation ensures robust, sustainable projects. For more information or to source high-quality geomembranes, contact suppliers like BPM Geosynthetics.


