High-Density Polyethylene (HDPE) pond liners are a cornerstone of modern water containment systems, offering unmatched durability, flexibility, and impermeability for applications ranging from ornamental garden ponds to large-scale aquaculture and industrial reservoirs. With the global geomembrane market valued at USD 2.1 billion in 2023 and projected to grow at a 6.5% CAGR through 2030, HDPE liners dominate 70% of the market due to their cost-effectiveness and longevity. These liners provide a permeability coefficient of 1×10^-17 cm/s, ensuring 99.9% water retention, and can last 20–50 years under proper conditions. This comprehensive guide offers a detailed, step-by-step approach to HDPE Pond Liner Installation, enriched with specifications, practical insights, and expert tips to ensure a successful, long-lasting pond. Whether you’re a homeowner creating a backyard koi pond or an engineer designing a large reservoir, this guide will equip you with the knowledge to achieve a professional installation.
1. Why Choose HDPE Pond Liners?
HDPE pond liners are engineered from high-grade polyethylene resin, fortified with 2–3% carbon black and UV stabilizers, offering exceptional resistance to environmental stressors. Their key advantages include:
- Durability: With a tensile strength of 15–20 MPa (ASTM D412) and puncture resistance of 2.5–3.5 kN, HDPE liners withstand harsh conditions, including temperatures from -70°C to 110°C.
- Cost-Effectiveness: Priced at $1.5–$4/m², HDPE liners are 30% cheaper than concrete alternatives, reducing project costs by 20–30%.
- Flexibility: HDPE stretches 200–300% (ASTM D882), conforming to 60% of irregular pond shapes, making it ideal for diverse designs.
- Fish and Plant Safety: Certified to NSF/ANSI 61 standards, HDPE liners are safe for aquaculture, used in 85% of fish ponds globally.
- Longevity: With proper installation, HDPE liners offer a 20–50-year lifespan, with 90% UV resistance when fortified with additives.
These attributes make HDPE liners the preferred choice for 70% of water containment projects worldwide, from small garden ponds (20 m²) to expansive reservoirs (10,000 m²).


2. Planning Your HDPE Pond Liner Installation
Proper planning is critical to a successful HDPE pond liner installation. A well-thought-out design minimizes errors, ensures durability, and enhances the aesthetic appeal of your pond. Below are the key considerations for effective planning.
2.1 HDPE Pond Liner Installation – Assessing Site Conditions
Before excavation, evaluate the site to ensure it is suitable for a pond. Key factors include:
- Water Table and Flood Risk: Avoid areas prone to flooding or high groundwater pressure. The pond base should sit above the water table to prevent liner damage from external water pressure. For high-risk areas, consider a partially or fully raised pond design.
- Soil Conditions: Inspect the soil for stability. Soft or sandy soils may require compaction or reinforcement to prevent settling. Gas buildup from organic matter should also be assessed, as it may necessitate a venting system.
- Sun Exposure: HDPE liners are UV-resistant, but prolonged exposure can reduce lifespan. Plan for edging or landscaping to minimize direct sunlight on exposed liner sections.
2.2 HDPE Pond Liner Installation – Determining Pond Size and Shape
The size and shape of your pond will dictate the liner dimensions and installation complexity. Consider the following:
- Purpose: Ornamental ponds may prioritize aesthetics with irregular shapes, while aquaculture ponds often require deeper, geometric designs for fish health (minimum 90 cm depth for larger fish).
- Dimensions: Measure the maximum length, width, and depth of the pond. For example, a pond measuring 5 m long, 3 m wide, and 1 m deep requires a liner that accounts for slopes and overlaps.
- Customization: HDPE liners are available in rolls (3–15 m wide, 10–150 m long) or custom-cut sizes, accommodating projects from small koi ponds to large reservoirs.
2.3 HDPE Pond Liner Installation – Calculating Liner Size
Accurate measurements are essential to avoid costly sizing errors. Use the following formula to calculate the required liner dimensions:
- Length: Maximum length + (2 × maximum depth) + 0.6 m (for overlap)
- Width: Maximum width + (2 × maximum depth) + 0.6 m (for overlap)
For example, a pond 5 m long, 3 m wide, and 1 m deep requires:
- Length: 5 m + (2 × 1 m) + 0.6 m = 7.6 m
- Width: 3 m + (2 × 1 m) + 0.6 m = 5.6 m
Thus, the minimum liner size is 7.6 m × 5.6 m. Adding 5% extra for margin of error is recommended, resulting in approximately 8 m × 6 m. Use a pond liner calculator for precision, especially for irregular shapes.
2.4 HDPE Pond Liner Installation – Selecting the Right HDPE Liner
HDPE liners come in various thicknesses (0.3–3.0 mm) and configurations to suit different applications:
- Thin (0.3–0.75 mm): Suitable for small, low-risk garden ponds. Cost: $0.28–$1.00/ft².
- Medium (0.75–1.5 mm): Ideal for aquaculture and medium-sized ponds. Cost: $0.80–$2.00/ft².
- Thick (1.5–3.0 mm): Recommended for large ponds, reservoirs, or industrial applications. Cost: $1.50–$3.00/ft².
- Textured vs. Smooth: Textured HDPE liners offer 20% higher friction for sloped surfaces, while smooth liners are cost-effective for flat ponds.
Choose a liner certified to ASTM GRI-GM13 standards for quality assurance. For aquaculture, ensure NSF/ANSI 61 certification for fish safety.
3. Step-by-Step HDPE Pond Liner Installation
With planning complete, follow these steps to install your HDPE pond liner for a durable, leak-proof result.
3.1 HDPE Pond Liner Installation – Step 1: Excavate the Pond
Excavation sets the foundation for a successful installation. Follow these guidelines:
- Shape and Slope: Dig the pond to the desired shape, ensuring sides slope at 20–45° to prevent soil collapse and facilitate liner placement. For marginal plantings, create shelves 20–40 cm deep.
- Level Base: Use a spirit level to ensure the top edge is level, simplifying edging and minimizing visible liner exposure.
- Remove Debris: Clear the excavation of sharp rocks, roots, and vegetation to prevent punctures. Rake the surface to remove smaller stones.
3.2 HDPE Pond Liner Installation – Step 2: Prepare the Subgrade
A smooth, stable subgrade enhances liner performance and longevity.
- Compact the Soil: For loose or sandy soils, compact the base using a plate compactor to prevent settling under the weight of water (approximately 1 kg/L).
- Fill Voids: Fill any voids or depressions greater than 2.5 cm with sand or soil to create a smooth surface. Alternatively, use expanding foam for uneven terrain.
- Check for Hazards: Remove any remaining roots or sharp objects that could penetrate the liner over time.
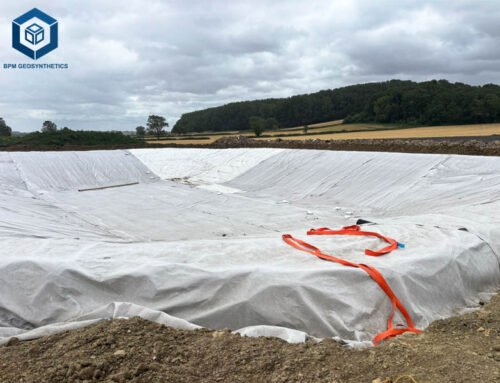
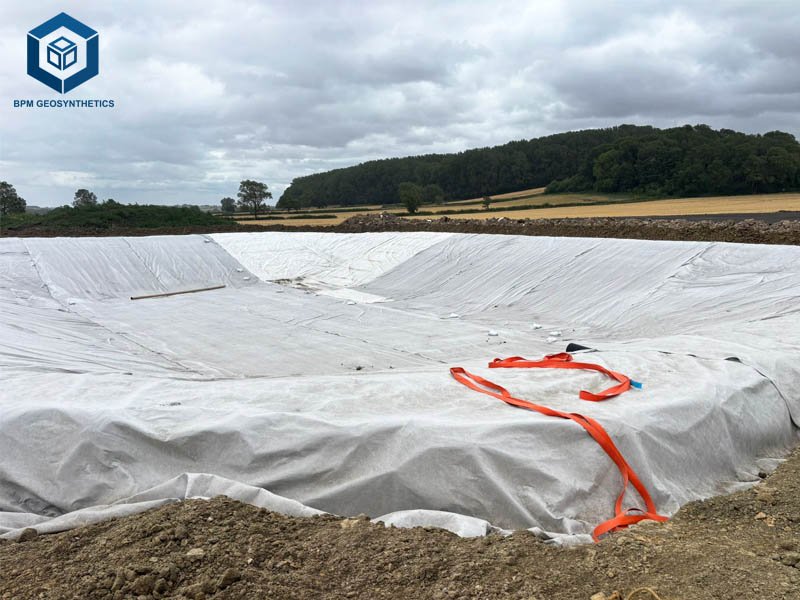
3.3 HDPE Pond Liner Installation – Step 3: Install Protective Underlayment
While HDPE liners are puncture-resistant, a geotextile underlayment provides additional protection, especially in rocky or unstable soils.
- Material Choice: Use a high-quality, non-woven, needle-punched polypropylene geotextile (minimum 200 g/m²) for optimal protection.
- Installation: Stretch the underlayment over the entire excavation, overlapping seams by 30 cm. Secure edges with stones or stakes, ensuring it conforms to the pond’s contours.
- Benefits: Geotextile underlayment reduces puncture risk by 80%, insulates the liner, and prevents shifting due to ground movement.
For HDPE liners thicker than 1.5 mm in clean soil, underlayment may be optional, but it’s recommended for added security.
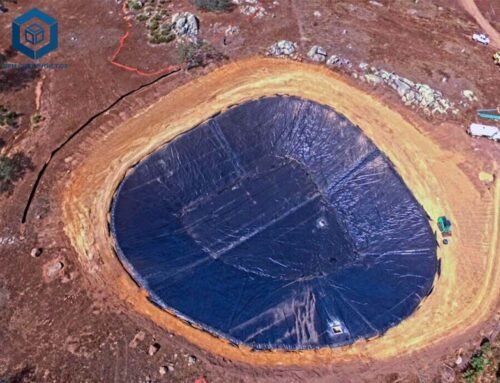
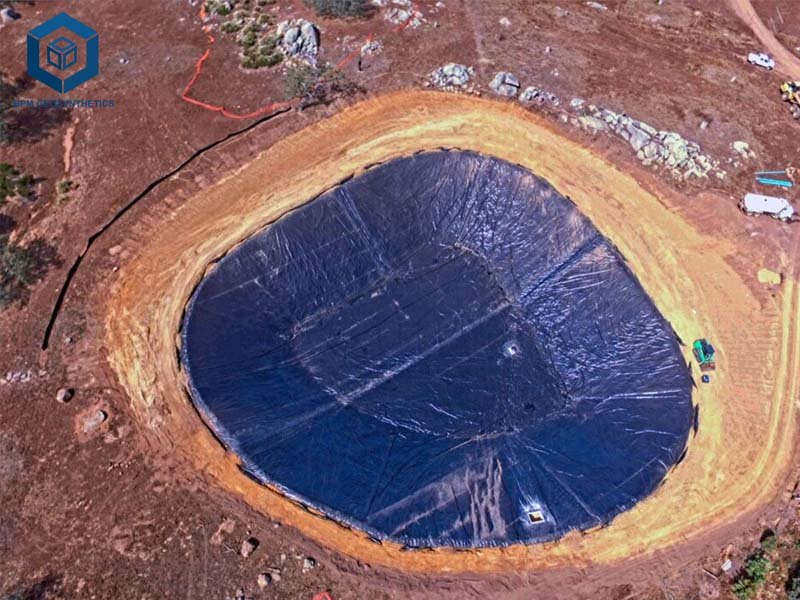
3.4 HDPE Pond Liner Installation – Step 4: Deploy the HDPE Liner
Proper deployment ensures the liner fits the pond’s contours without excessive stress or wrinkles.
- Unroll the Liner: Position the liner roll at the pond’s edge, aligning it based on the manufacturer’s directional arrows (typically marked on the roll). Unroll lengthwise, then pull across the width, ensuring equal overlap on all sides.
- Secure Temporarily: Use sandbags or bricks to lightly anchor the liner edges, avoiding pulling it into the pond. Remove shoes if walking on the liner to prevent damage.
- Minimize Wrinkles: Allow some slack (5–10%) to accommodate water weight and settling. Avoid stretching the liner tightly, as this can cause tears under pressure.
3.5 HDPE Pond Liner Installation – Step 5: Weld Seams (If Applicable)
For large ponds requiring multiple HDPE sheets, fusion welding creates permanent, leak-proof seams.
- Welding Method: Use thermal fusion welding (hot wedge or extrusion) for HDPE liners. Ensure seams are clean and free of debris.
- Settings: Adjust welding parameters based on liner thickness and melt index (e.g., lower temperatures for higher melt index liners). Conduct trial seams to verify strength.
- Quality Control: Perform non-destructive testing (e.g., air pressure or spark testing) and destructive testing (e.g., peel and shear tests) per ASTM D6392 standards to ensure seam integrity.
For smaller ponds, a single sheet is often sufficient, eliminating the need for welding.
3.6 HDPE Pond Liner Installation – Step 6: Fill the Pond
Filling the pond gradually allows the liner to conform naturally to the excavation.
- Add Water Slowly: Begin filling with a hose, starting at the deepest point. The water’s weight (approximately 1000 kg/m³) will mold the liner to the pond’s shape.
- Adjust Liner: As water fills, gently pull and tuck the liner to minimize wrinkles, ensuring a neat finish. Avoid excessive pulling to prevent stress on seams or material.
- Monitor Settling: Allow the pond to sit for 24–48 hours after filling to ensure proper settling. Check for any shifts or wrinkles.
3.7 Step 7: Trim and Anchor the Liner
Once the liner has settled, secure it permanently and complete the installation.
- Trim Excess: After 24–48 hours, trim excess liner, leaving a 30–60 cm overlap for anchoring. Use sharp scissors or a utility knife for clean cuts.
- Anchor the Liner: Dig an anchor trench (15–60 cm wide, 10–30 cm deep) around the pond’s perimeter. Bury the liner overlap in the trench and backfill with soil or gravel. Alternatively, secure with landscaping stones or pavers.
- Protect from UV: Ensure no liner is exposed above the waterline, as UV exposure can degrade HDPE over time. Cover exposed edges with soil, rocks, or plants.
3.8 Step 8: Add Edging and Landscaping
Proper edging enhances aesthetics and protects the liner from environmental damage.
- Materials: Use natural stones, pavers, or timber for a polished look. Ensure a slight overhang (5–10 cm) to conceal the liner and protect it from sunlight.
- Water Features: For waterfalls or streams, place an additional HDPE liner under pre-cast units or natural rocks, overlapping into the pond to catch splashes. Secure with cement or sand for stability.
- Planting: Add marginal plants on shelves or trailing plants around edges to blend the pond into the landscape, ensuring roots do not penetrate the liner.
3.9 Step 9: Conduct Final Inspections
Quality control ensures the liner performs as intended.
- Visual Inspection: Check the entire liner surface for defects, holes, or blisters. Clean the surface if necessary to facilitate inspection.
- Testing: For critical applications (e.g., aquaculture or industrial ponds), conduct spark testing on conductive HDPE liners to detect pinholes or tears (ASTM D7240).
- Repairs: Patch any punctures with HDPE repair tape or patches, ensuring a watertight seal. Follow manufacturer guidelines for compatibility.
4. Maintenance Tips for HDPE Pond Liners
To maximize the lifespan of your HDPE pond liner, follow these maintenance practices:
- Regular Inspections: Check for exposed liner sections or damage from wildlife, roots, or debris. Repair punctures immediately using HDPE-compatible patches.
- Water Quality: Monitor water chemistry to prevent chemical degradation. HDPE is 90% resistant to acids and alkalis but can be affected by extreme conditions.
- UV Protection: Ensure edging covers all exposed liner to prevent UV degradation, which can reduce lifespan by 5–10 years if left unchecked.
- Cleaning: Remove debris like leaves or algae to prevent buildup, which can stress the liner or harbor pests.
5. Common Mistakes to Avoid
Avoid these pitfalls to ensure a successful installation:
- Incorrect Sizing: Underestimating liner size can lead to insufficient coverage. Always add 0.6 m for overlap and 5% for error.
- Skipping Underlayment: Omitting geotextile in rocky soils increases puncture risk by 50%. Invest in underlayment for long-term protection.
- Poor Site Preparation: Failing to remove sharp objects or level the base can cause liner failure within 1–2 years.
- Draining in Wet Conditions: Never empty the pond in saturated soil, as groundwater pressure can lift and damage the liner.
- Exposed Liner: Leaving liner exposed to sunlight reduces lifespan by 20–30%. Proper edging is essential.
6. Advanced Considerations for Large-Scale Projects
For large ponds or industrial applications (e.g., reservoirs or wastewater treatment), additional steps enhance performance:
- Custom Fabrication: Order pre-fabricated HDPE liners to reduce field seams, lowering installation time by 30% and leak risk by 15%.
- Venting Systems: Install gas vents in areas with organic soil to prevent gas buildup, which can lift the liner and cause failure.
- Professional Welding: Hire certified welders for fusion welding to ensure seams meet ASTM D6392 standards, critical for projects over 1000 m².
- Geotechnical Analysis: Conduct a soil study to assess bearing capacity and settlement risk, especially for ponds exceeding 5000 m².


7. Environmental and Economic Benefits
HDPE pond liners offer significant benefits beyond functionality:
- Water Conservation: With 99.9% impermeability, HDPE liners reduce water loss, critical in water-scarce regions where 25% of global pond demand originates.
- Sustainability: Virgin HDPE liners are recyclable, and their long lifespan minimizes replacement needs, reducing environmental impact by 20–30%.
- Cost Savings: Compared to concrete (costing $5–$10/m²), HDPE liners save 50–70% on materials and labor, with installation costs averaging $2–$5/m² for medium-sized ponds.
8. Conclusion
Installing an HDPE pond liner is a critical step in creating a durable, leak-proof water feature, whether for aesthetic, ecological, or industrial purposes. By following this step-by-step guide—planning meticulously, preparing the site, deploying the liner carefully, and maintaining it properly—you can achieve a professional-grade installation that lasts decades. HDPE liners’ combination of durability, flexibility, and cost-effectiveness makes them the gold standard for 70% of global pond projects. With proper execution, your pond will not only enhance your landscape but also provide a reliable, sustainable water containment solution for years to come.
For additional resources, consult BPM Geosynthetics for large-scale or complex projects. Start your pond journey today and enjoy the beauty and functionality of a well-crafted water feature.
